
The best way to start a LEGO city is to begin small and build with a plan. Choose a realistic space and budget, decide what type of city you want to create, then start with one or two buildings, a simple road layout and a handful of vehicles and minifigures. Focus on creating one complete, believable street before expanding. A well-planned city that grows gradually is almost always more enjoyable—and less expensive—than trying to build everything at once.
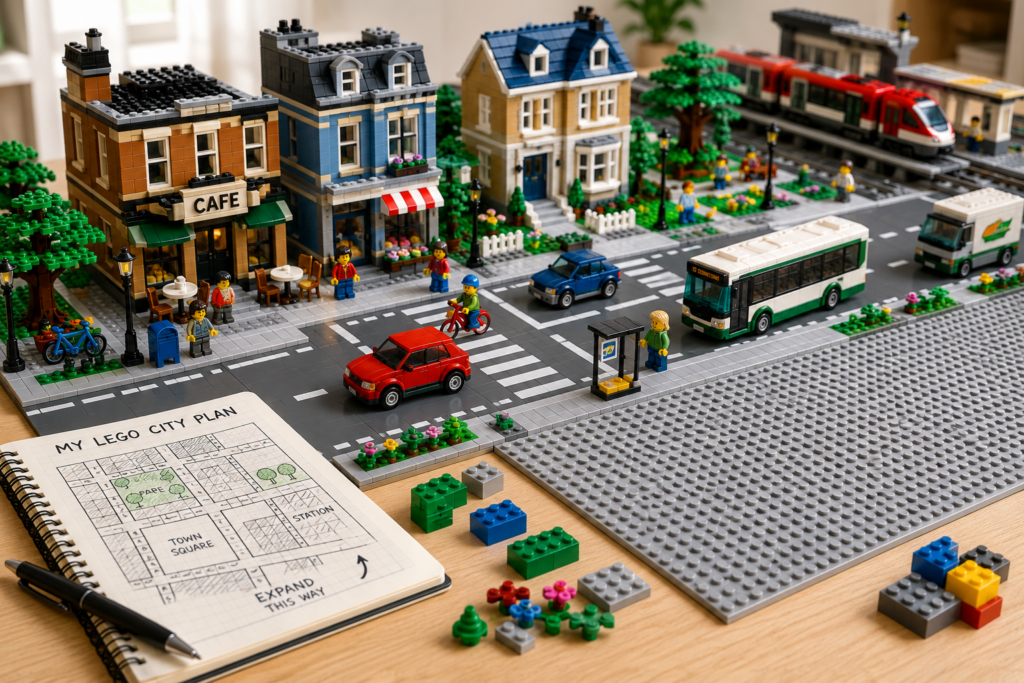
Why starting the right way saves time, money and frustration
Building a LEGO city can be one of the most rewarding parts of the hobby.
It can also become surprisingly expensive and overwhelming if you rush into buying sets without a plan.
Many beginners start by purchasing whatever looks exciting, only to discover they have:
- buildings that don’t fit together
- nowhere to place roads
- duplicate vehicles
- very little scenery
- no room left to expand
The result often feels more like a collection of individual LEGO sets than a real town.
The good news is that avoiding these problems is straightforward.
By making a few sensible decisions before you buy your first set, you’ll create a city that’s easier to expand, costs less over time and feels far more realistic.
Think of your first LEGO city as the foundations of a long-term project rather than something you’ll finish in a weekend.
What is a LEGO city?
A LEGO city is a collection of connected buildings, roads, vehicles, people and scenery arranged to create a believable town or city.
It can be almost any size.
Some people build a single street on a shelf.
Others fill an entire room with trains, skyscrapers, parks and hundreds of buildings.
Neither approach is more “correct” than the other.
The goal isn’t to build the biggest city possible.
The goal is to build a city that feels connected, enjoyable to work on and satisfying to look at.
Your city should tell a story.
Someone should be able to look at it and imagine people living, working and travelling through it.
Start with a vision—not a shopping list
Before buying your first set, spend a few minutes thinking about the type of city you want to build.
This doesn’t need to be a detailed masterplan.
In fact, over-planning can stop you getting started.
Instead, answer a few simple questions.
- Do you want a modern city or something more traditional?
- Will your city be realistic or playful?
- Is it mainly for display or for play?
- Will you build alone or with children?
- Do you want trains in the future?
- Would you like rivers, mountains or countryside surrounding the city?
Having a rough direction makes buying decisions much easier later.
Decide where your city will live
This is the single most important decision you’ll make.
Many people buy several large LEGO sets before deciding where they’ll actually display them.
Eventually they realise the city has already outgrown the available space.
Instead, measure your display area first.
Common locations include:
- a shelf
- a desk
- a dining table
- a dedicated hobby table
- modular display cabinets
- a spare bedroom
- a loft conversion
- a garage
Don’t worry if your available space seems small.
Some of the most impressive LEGO cities consist of just one beautifully designed street.
A compact city that looks complete almost always feels more satisfying than a huge layout that’s permanently unfinished.
Permanent or temporary?
Next, think about how often you’ll need to move your city.
Permanent display
If your city can stay assembled all year, you have complete freedom.
You can add lighting, complex landscaping, bridges and larger buildings without worrying about moving everything.
Temporary display
Many people build on a dining table or shared family space.
If that’s your situation, design the city in smaller sections that can be lifted individually.
This makes packing away much quicker and reduces the chance of damage.
It also makes future expansion much easier because you’re already building in manageable modules.
Choose a realistic budget
One of the biggest misconceptions about LEGO cities is that they’re only for people willing to spend thousands of pounds.
That’s simply not true.
A good LEGO city grows over time.
Most experienced builders didn’t buy everything in one year.
They added new streets, buildings and scenery gradually as their budget allowed.
As a rough guide:
| Budget | What you could realistically build |
| £100–£250 | One small street with a couple of buildings, vehicles and minifigures |
| £250–£600 | A complete neighbourhood with roads and public spaces |
| £600–£1,500 | Multiple connected streets with parks, shops and larger buildings |
| £1,500+ | A large, highly detailed city with room for specialist areas like docks, railways or industrial zones |
Don’t compare your beginning with someone else’s ten-year project.
Brick Squared Tip
Build one complete scene before starting another.
A finished street with buildings, roads, trees, vehicles and people always looks better than five unfinished streets.
Completing small sections also keeps motivation high because every building session leaves you with something finished to enjoy.
Build a neighbourhood, not a city
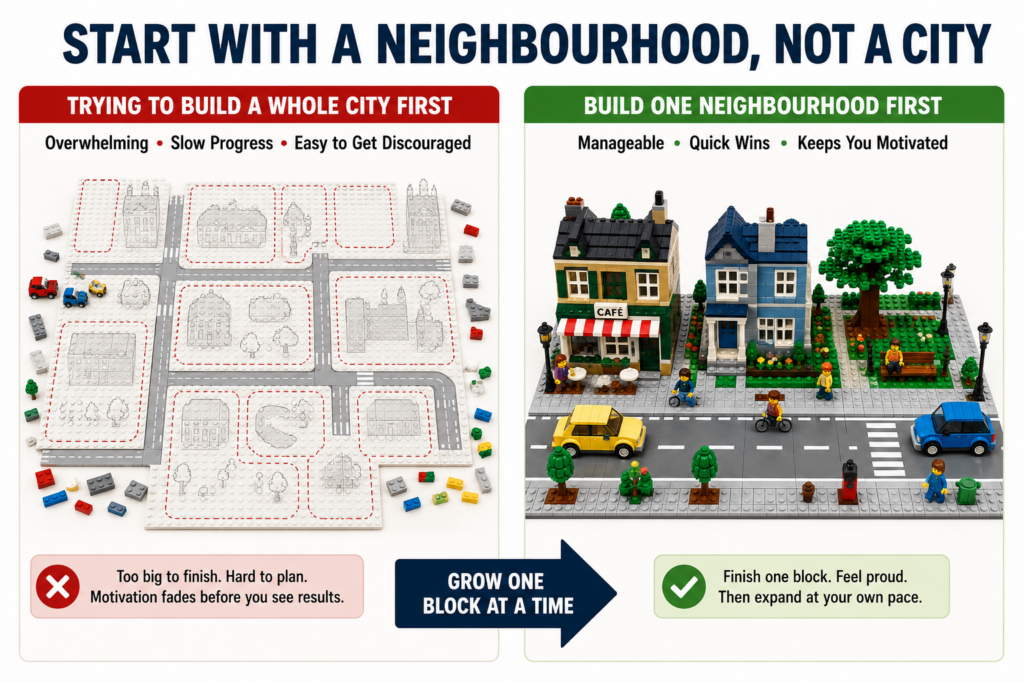
One of the easiest ways to become overwhelmed is by thinking about the finished city.
Instead, think about your first neighbourhood.
Imagine a single block that contains:
- one road
- two or three buildings
- a few parked cars
- several minifigures
- some trees
- benches
- streetlights
- a pedestrian crossing
That small scene already tells a story.
Once it feels complete, simply extend the road and repeat the process.
Cities grow naturally this way.
Decide on your building style early
LEGO cities come in many different styles.
Knowing which one appeals to you helps avoid buying sets that don’t work well together.
LEGO City
Designed mainly for play.
Bright colours.
Easy to build.
Excellent for children and families.
Modular buildings
Modular buildings are highly detailed LEGO buildings designed to connect neatly together into realistic streets.
They include removable floors and detailed interiors.
They’re particularly popular with adult builders.
They also tend to be much more expensive.
Custom-built cities
Instead of relying mainly on official sets, many hobbyists design their own buildings from individual LEGO bricks.
This provides unlimited creative freedom but usually requires more experience.
Hybrid cities
Most experienced builders eventually end up here.
They combine official LEGO sets with custom roads, landscaping and modifications.
It’s often the best balance between cost, creativity and realism.
The six ingredients every LEGO city needs
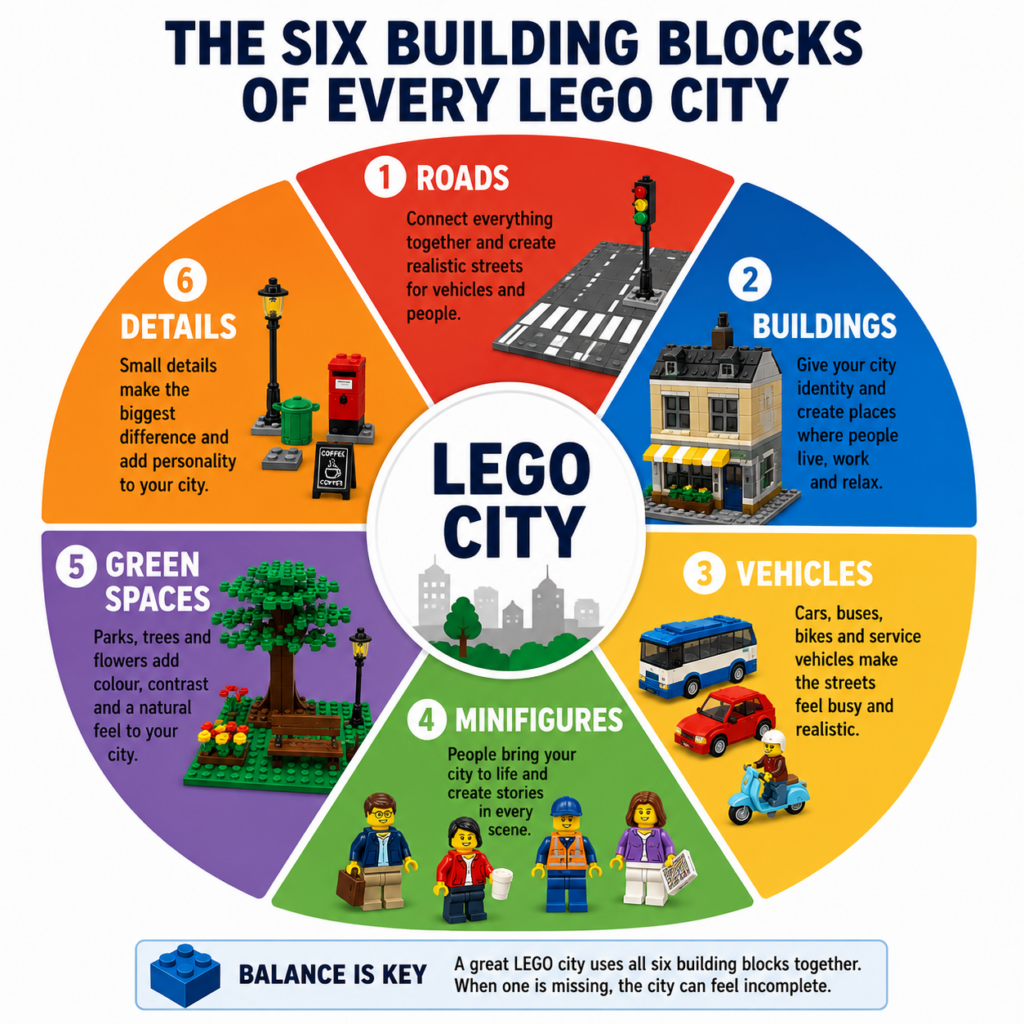
Regardless of size or style, almost every successful LEGO city contains the same six elements.
Getting the balance right is more important than buying lots of expensive sets.
1. Roads
Roads connect everything together.
Without roads, buildings simply become separate display models.
Roads also create space for traffic, junctions, pavements and future expansion.
We’ll explore road systems in detail in our dedicated road guides.
2. Buildings
Buildings create the city’s identity.
Aim for variety rather than quantity.
A bakery, apartment building and café usually create a more interesting street than three similar shops.
3. Vehicles
Cars, buses, bicycles, motorbikes, emergency vehicles and delivery vans make streets feel busy.
You don’t need dozens.
A handful of carefully placed vehicles usually looks far more realistic than every road being full.
4. Minifigures
Minifigures bring everything to life.
Instead of standing them in straight lines, give them something to do.
Someone could be walking a dog.
A builder might be repairing a pavement.
Friends could be sitting outside a café.
Small stories make people stop and look closer.
5. Green spaces
Trees, grass, flowers and parks prevent a city becoming a sea of grey bricks.
Even one small park can completely change the atmosphere of a street.
6. Details
Small details make the biggest difference.
Think about adding:
- benches
- bins
- traffic lights
- bus stops
- bicycles
- newspaper stands
- post boxes
- outdoor seating
- market stalls
These are the features people often notice after they’ve admired the buildings.
Which buildings should you buy first?
The temptation is to buy the largest building you can afford.
Instead, think about building a believable street.
A balanced first collection could include:
- a café or bakery
- a residential building
- a public building such as a police station or fire station
- a corner building to create visual interest
Different heights and purposes immediately make the city feel more realistic.
If your budget only stretches to one building, choose something versatile that would naturally fit into almost any town.
Should you buy modular buildings?
If you’ve spent any time looking at LEGO cities online, you’ve probably seen modular buildings.
These are premium LEGO buildings designed to connect seamlessly into realistic streets.
Advantages
- exceptional detail
- consistent scale
- removable floors
- easy to expand
- excellent display value
Things to consider
- significantly more expensive than standard LEGO City sets
- require more display space
- may be too detailed for younger children who mainly want to play
For many beginners, it’s perfectly sensible to start with LEGO City sets and add modular buildings later as the city grows.
There’s no need to choose one approach forever.
Should you start with roads or buildings?
This is one of the first decisions every beginner faces.
The honest answer is that you need both—but if you’re building a connected city rather than simply collecting sets, roads should usually come first.
Why?
Because roads determine almost everything else.
They decide:
- where buildings can go
- how vehicles move
- where parks fit
- where pedestrians walk
- how your city can expand in the future
Moving a building is easy.
Rebuilding an entire road network after you’ve added dozens of buildings is not.
Even if you only sketch your roads on paper first, you’ll make much better decisions when buying future sets.
Understanding your road options
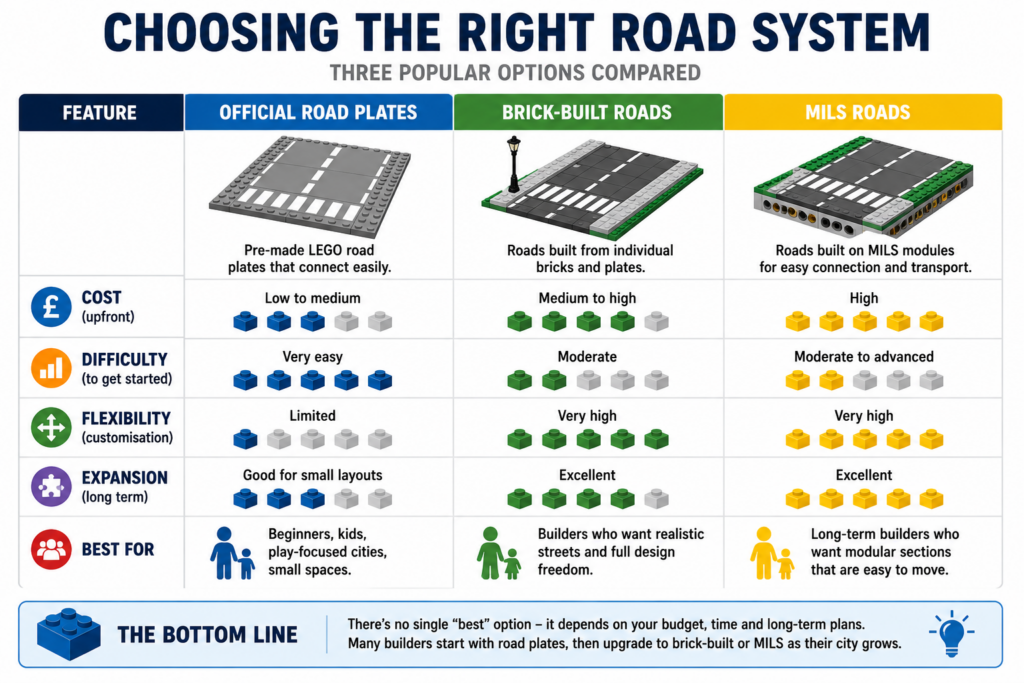
There isn’t a single “best” way to build LEGO roads.
Each method has advantages depending on your budget, available space and long-term plans.
Option 1: Official LEGO road plates
Road plates are pre-made road sections produced by LEGO.
They click together quickly and provide an easy way to create streets.
Best for:
- beginners
- children
- smaller layouts
- people who want to start building immediately
Pros
- quick to assemble
- consistent appearance
- easy to rearrange
- no planning required
Cons
- limited customisation
- can become expensive if you need lots of them
- fewer options for road markings and junctions
Option 2: Brick-built roads
Instead of using official road plates, you build the roads yourself from individual LEGO pieces.
This requires more planning but offers complete flexibility.
You can create:
- any width
- realistic junctions
- custom parking bays
- cycle lanes
- bus lanes
- textured pavements
- realistic kerbs
Best for:
- long-term cities
- display layouts
- builders who enjoy customisation
The initial cost can be higher, but you aren’t limited by LEGO’s official road designs.
Option 3: MILS roads
MILS stands for Modular Integrated Landscaping System.
Although the name sounds technical, the idea is straightforward.
Instead of building directly onto a baseplate, each section sits on a stronger brick-built base with standardised connection points.
This creates individual modules that can be connected, separated and rearranged whenever needed.
MILS has become extremely popular because it makes large cities easier to transport and expand.
It does use considerably more bricks than simpler methods, so it’s usually best suited to people planning a long-term project.
If you’re unsure whether it’s right for you, don’t worry.
Our dedicated MILS guides explain everything step by step and help you decide whether the extra investment is worthwhile.
How wide should your roads be?
Road width is one of those decisions that seems small but has a huge impact on the finished city.
Roads that are too narrow make larger vehicles look awkward.
Roads that are too wide can dominate the layout, leaving very little room for buildings or parks.
For most beginners, a simple two-way road with pavements on either side provides the best balance.
Resist the temptation to recreate huge American-style highways unless that’s genuinely the look you’re aiming for.
Compact streets generally feel busier, more realistic and make better use of limited space.
As your city expands, you can always add wider roads or dual carriageways where they make sense.
Don’t overlook pavements
Many first-time builders focus almost entirely on roads.
In reality, pavements are where much of the life happens.
They create space for:
- pedestrians
- outdoor cafés
- benches
- bus stops
- bicycle racks
- lamp posts
- flower beds
- shop displays
- trees
- market stalls
Without pavements, buildings often appear to sit directly on the road, making the whole layout feel unfinished.
Well-designed pavements also encourage you to add the small details that give a city its personality.
Plan how people move around
It’s natural to think about roads first.
But cities aren’t built for cars alone.
Imagine you’re a minifigure walking through your city.
Can you:
- safely cross the road?
- reach every building?
- walk through the park?
- sit on a bench?
- visit the café?
- get to the train station?
If the answer is yes, your layout will probably feel believable.
Thinking about pedestrians often leads to better road layouts, more green spaces and a more enjoyable city overall.
Group similar buildings together
Rather than placing buildings wherever they fit, create areas with a clear purpose.
Even a small city becomes much easier to understand when it has distinct neighbourhoods.
For example:
Town centre
- cafés
- restaurants
- offices
- apartments
- shops
Residential area
- houses
- gardens
- playgrounds
- local shops
Industrial area
- warehouses
- construction sites
- freight depots
- factories
Leisure area
- parks
- sports facilities
- cinema
- waterfront
- fairground
You don’t need every district immediately.
A well-finished town centre is a better starting point than four unfinished neighbourhoods.
Remember to build upwards as well as outwards
Many beginners only think about the footprint of their city.
Height is just as important.
Adding different levels makes even a modest layout feel larger and more interesting.
Simple ways to introduce height include:
- raised railway lines
- bridges
- hills
- retaining walls
- staircases
- taller corner buildings
- elevated parks
Even subtle height differences create depth and improve photographs of your city.
Leave room for the future
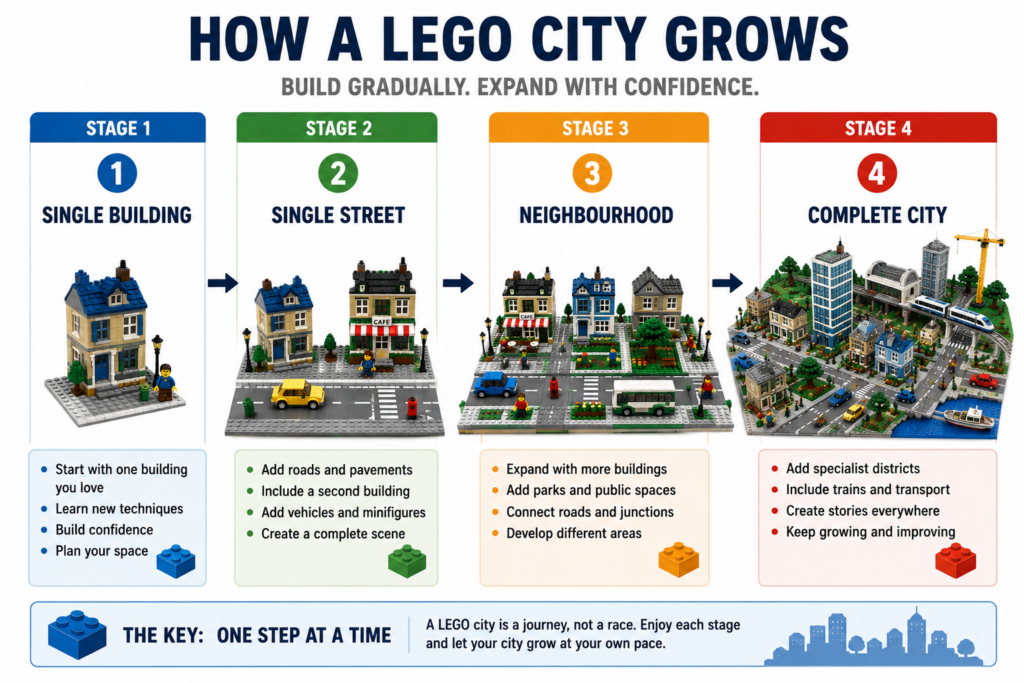
Perhaps the biggest mistake beginners make is filling every available space immediately.
It feels satisfying in the short term.
Unfortunately, it often creates problems later.
Leave empty spaces where future roads might continue.
Allow gaps between some buildings.
Think about where a railway, tram line or park could eventually go.
A little empty space isn’t wasted.
It’s planning for tomorrow.
Common Mistake
Trying to recreate someone else’s city.
It’s easy to spend hours watching YouTube tours of enormous LEGO cities and feel that yours isn’t good enough.
Remember that many of those layouts have taken years—or even decades—to build.
Use them for inspiration, not comparison.
Build a city that suits your available space, your budget and the aspects of the hobby you enjoy most.
A city you’re proud of will always be more rewarding than an unfinished copy of someone else’s.
Budget Builder
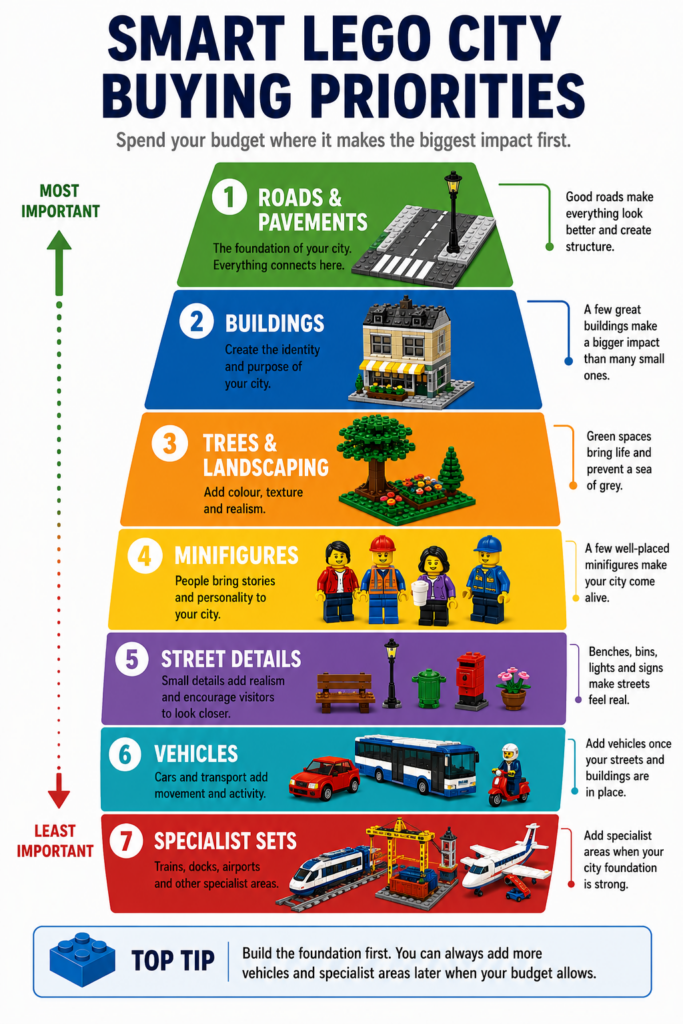
Spend your money where it creates the biggest visual impact.
If you’re working with a limited budget, prioritise purchases in roughly this order:
- Roads and pavements
- A couple of versatile buildings
- Trees and landscaping
- Minifigures
- Small street furniture
- Extra vehicles
This might seem surprising.
Many beginners buy lots of vehicles first because they’re relatively affordable.
However, vehicles look far better when they’re driving through a convincing street rather than sitting on an empty baseplate.
Building the environment first almost always gives better value for money.
How to build your city without overspending
A LEGO city doesn’t need to become an expensive race to buy the latest releases.
In fact, slower builders often end up with more cohesive cities because every purchase has a purpose.
Buy gradually
Adding one meaningful section every month allows you to enjoy each stage of the project.
It also gives you time to discover what your city actually needs before buying more sets.
Shop around
LEGO sets regularly go on sale through major retailers.
Unless a set is about to retire, patience often saves a significant amount of money.
Those savings can quickly add up to another building or road section.
Buy individual bricks when appropriate
Not every project needs a complete LEGO set.
Roads, pavements, walls and landscaping often work out much cheaper when built from individual pieces.
As your city grows, learning when to buy bricks instead of sets can reduce costs considerably.
Reuse older LEGO
Returning fans often already own useful pieces.
Old houses can become cafés.
A castle tree might look perfect in a city park.
Construction vehicles work in almost any modern layout.
Don’t underestimate what you already have.
Avoid buying for the sake of buying
Ask yourself one simple question before every purchase:
“What problem does this solve in my city?”
If you can’t answer it, the set can probably wait.
That’s one of the easiest ways to avoid expensive impulse purchases.
Required Parts / Tools
One of the best things about building a LEGO city is that you don’t need a workshop full of specialist equipment.
You can get started with surprisingly little.
Essential
- A flat display surface
- Your first LEGO building or small collection of bricks
- A brick separator (included with many LEGO sets)
- Somewhere to store spare pieces
- Good lighting so you can comfortably build and sort parts
Recommended
As your city grows, these items become increasingly useful.
- Stackable storage drawers or boxes
- Small containers for sorting parts
- Measuring tape for planning layouts
- Notebook or sketchbook for ideas
- A smartphone or camera to photograph your progress
Taking occasional photos is surprisingly valuable.
They help you spot empty areas, poor road layouts or buildings that look out of place—things that are often difficult to notice while you’re sitting at the table building.
Optional
If you decide to build a larger permanent city, you may eventually want:
- Baseplates or MILS-compatible modules
- Display tables
- Dust covers or cabinets
- LED lighting
- Labels for organised storage
None of these are essential.
Many excellent LEGO cities have been built with nothing more than a dining table and a growing collection of bricks.
Before You Buy
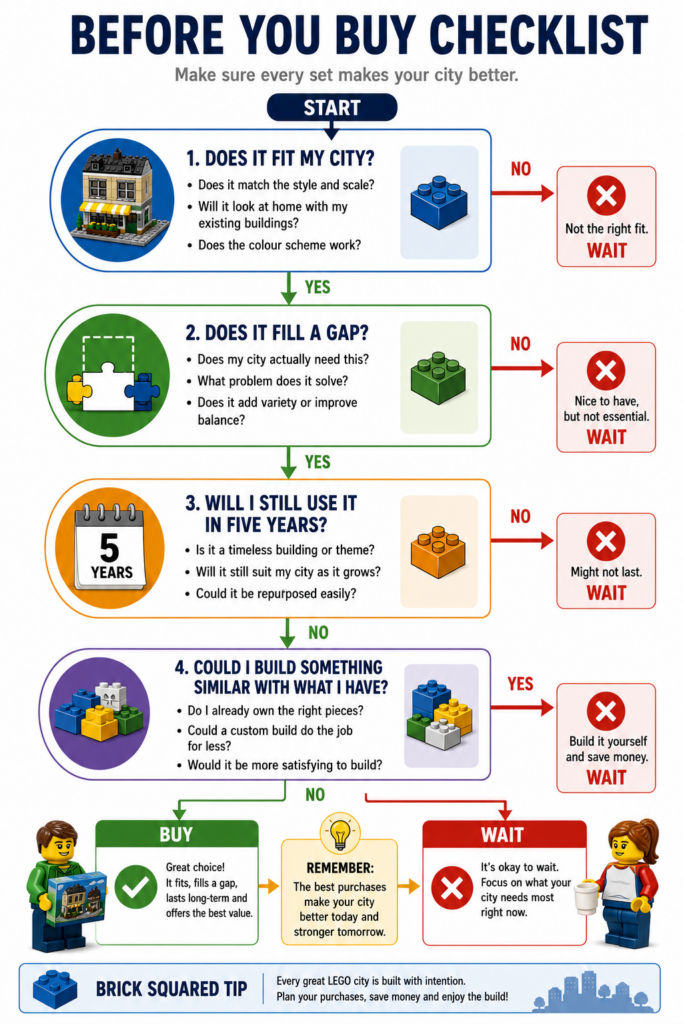
Every purchase should improve your city, not simply increase your collection.
Before buying another set, ask yourself these questions.
Does it fit the style of my city?
A fantastic LEGO set isn’t always the right LEGO set.
If you’re building a realistic town, a futuristic spaceship or medieval castle may not integrate well unless you’re deliberately creating a mixed-theme display.
Buying with a clear vision helps your city feel more cohesive.
Does it fill a gap?
Look at your layout objectively.
Do you already have several cafés but nowhere for people to live?
Do you have roads but no public transport?
Would a park improve the city more than another building?
The best purchases usually solve a problem rather than create another one.
Will it still suit my city in a few years?
Some sets are designed around short-lived themes or trends.
Classic buildings, parks, transport and landscaping rarely go out of style.
If your goal is a long-term display, timeless designs usually offer better value.
Could I build something similar myself?
As your confidence grows, you’ll discover that many simple structures are surprisingly easy to build from your existing collection.
Small shops, bus stops, walls, flower beds and market stalls often cost far less when built from loose bricks than when bought as complete sets.
Learning to mix official sets with your own creations is one of the biggest steps towards building a city that feels unique.
Inspiration
If you ever run out of ideas, stop looking at LEGO for a while.
Instead, look at real places.
Visit your local town centre.
Walk through a park.
Look out of the train window.
Pay attention to details that most people overlook.
Notice things like:
- where trees are planted
- how roads curve around buildings
- different roof heights
- pedestrian crossings
- bus stops
- benches
- flower beds
- bicycle parking
- outdoor seating
- delivery areas behind shops
These are the details that make real towns feel believable, and they’ll make your LEGO city feel believable too.
Another great source of inspiration is storytelling.
Ask yourself questions about your city.
Who owns the bakery?
Why has the delivery van stopped outside the café?
Where is the family walking on a Saturday morning?
Thinking about the people, rather than just the buildings, naturally leads to more interesting scenes.
When should you start building your own creations?
Many beginners think they need to design custom buildings straight away.
You don’t.
There’s absolutely nothing wrong with building official LEGO sets exactly as the instructions show.
In fact, it’s one of the fastest ways to learn useful building techniques.
As your confidence grows, you’ll naturally begin making small changes.
You might:
- add another floor to a building
- redesign a roof
- swap colours
- extend a shop
- improve the garden
- build a custom bus stop
- create a park from spare pieces
Before long, you’ll probably find yourself designing entire buildings from scratch.
The transition happens naturally.
There’s no need to force it.
How do you know your city is working?
You don’t need hundreds of buildings to judge whether your city is successful.
Instead, ask yourself a few simple questions.
- Does every building have a purpose?
- Can people move naturally through the streets?
- Do the roads make sense?
- Are there places to stop, relax and gather?
- Is there enough greenery to break up the buildings?
- Does each new addition improve the city rather than simply make it bigger?
If the answer to most of these is yes, you’re heading in the right direction.
Remember that a great LEGO city isn’t measured by its size.
It’s measured by how enjoyable it is to build, explore and continue improving.
Key Takeaways
- Start with the space you have, not the city you hope to build one day.
- Set a realistic budget and let your city grow gradually.
- Build one complete neighbourhood before expanding further.
- Plan your road layout early, even if it’s only a simple sketch.
- Mix buildings, roads, parks and public spaces to create a believable town.
- Add people and small details to tell stories throughout your city.
- Leave room for future expansion rather than filling every available space.
- Buy sets because they improve your city, not simply because they’re new.
- Learn from official LEGO builds before worrying about custom designs.
- Focus on steady progress rather than comparing yourself with much larger cities online.
Brick Squared Verdict
The biggest difference between an average LEGO city and a great one isn’t money—it’s planning.
The most memorable cities aren’t necessarily filled with the most expensive sets. They’re the ones where every street feels connected, every building has a purpose and every new addition makes the whole layout feel more alive.
Start with a single street that you’re genuinely proud of.
Add to it when your budget allows.
Don’t be afraid to change your plans as your skills improve.
Most importantly, enjoy the process.
A LEGO city is never truly finished, and that’s exactly what makes it such a rewarding hobby. Every new building, road and park is another opportunity to improve something you’ve already created.
Read Next
Ready to build the next part of your city? These guides will help you continue with confidence.
How to Build a MILS Base – A step-by-step guide to constructing strong, expandable modules for long-term LEGO city building.
How to Build LEGO City Roads – Compare official road plates, brick-built roads and MILS to choose the best approach for your city.
How Wide Should LEGO City Roads Be? – Learn how road and pavement widths affect realism, vehicle compatibility and future expansion.
How to Make LEGO Roads Cheaper – Practical ways to build convincing roads while keeping costs under control.
How to Connect LEGO Modular Buildings to Roads – Create seamless transitions between buildings, pavements and roads for a professional-looking street.
How to Build LEGO City Pavements and Sidewalks – Add realistic public spaces, street furniture and pedestrian areas that bring your city to life.
What Is MILS in LEGO? A Beginner’s Guide – Understand the Modular Integrated Landscaping System and whether it’s the right foundation for your city.